Showing posts with label Home Decor. Show all posts

Friday, April 19, 2013

Capital Style Magazine: DIY Terrarium


In case you missed it, we Pin Sisters shared a fun DIY project in the March issue of Capital Style Magazine! Terrariums are all the rage right now. A great way to bring a little bit of mother nature to your indoor space. To view the lovely layout and magazine article, click here. Otherwise, read below and enjoy! Let us know how your terrarium turns out should you take on this little project.

And YES! That's another MISA ME Photography image on the cover from yours truly! Wahoo!


-------


A trendy tabletop garden that requires minimal care! Sounds like a dream for those of us who may not have been blessed with a "green thumb" but appreciate the beauty and peace greenery can bring to your home. The proper term for this little slice of mother nature indoors is commonly referred to as a terrarium -- A mini indoor garden contained in a glass vessel. 


There is a ton of DIY terrarium inspiration online! Each with a variety of succulents, cacti, moss and/or ferns. However, don't go mixing and matching these little guys together just yet! These terrarium-friendly plants have their individual preferences when if comes to their environment and care.

We turned to the experts for great maintenance tips to make sure our terrarium receives the low-maintenance TLC it deserves! The information below came from a great resource, terrariavt.com.

Tips for a succulent and cacti terrarium:
  •  Succulents and cacti live in arid environments and need little water to thrive. Spraying with a light mist every week will suffice. 
  • Succulents and cacti like plenty of light! They will do well placed near a window that gets indirect light for majority of the day. Too much direct sunlight will cause the terrarium to get very warm and potentially harm the plants.
  • It is advised to remove fallen leaves from the terrarium. This will prevent rotting.
Tips for a moss and fern terrarium:
  •  Moss and ferns thrive on moisture! Spritzing water with a sprayer two or three times a week will suffice. Don't allow them to dry out!
  • Moss and ferns like shaded and humid environments so keep away from direct sunlight.
  • Air is also important! So if you've chosen a closed glass container, remove the lid periodically for a few hours.
So, how do you make a terrarium of your own? It couldn't be any more simple!

Here are the supplies we used:  


  •  open glass container (a closed container can be used for a moss/fern terrarium)
  •  river rock or similar material
  •  activated charcoal
  • cactus soil or potting soil
  • variety of succulents, cacti, moss and/or ferns
  • any desired terrarium decor

 Here are the steps we followed to create our own little indoor garden:

  1. Choose an open or closed glass container depending on the terrarium you'd like to create
  2. Cover the bottom with about a layer of pebbles or river rocks to create a false drainage system for the plant roots
  3. Add a thin layer of activated charcoal. This is necessary if you have chosen a closed glass container! This charcoal will filter the air and keep it fresh.
  4. Add a layer of cactus soil or potting soil, depending on if you choose to use cacti paired with succulents or ferns paired with moss.
  5. Place your plants in the terrarium.

 Pin Sister Tips: 

  • Moss or ground cover, found at your local gardening store, can be used to enhance the look of your terrarium! 
  • If you've found the perfect glass vessel but it has a few areas where water or materials can seep through, simply purchase a silicon sealer from a local hardware store and seal any problem areas. 


Tuesday, March 19, 2013

DIY Rustic Candle Wall Display


Hello fellow pin lovers! YES, we are alive! We are cringing at the fact that our last post was January 30th (Eeeeeekk!). But, with the onset of spring there are a ton of DIY projects that we have high hopes of taking on and of course sharing with you.

Since our last post, we have been published in Capital Style Magazine! The February issue was a double whammy of accomplishments. One of my MISA ME Photography images was selected to be the COVER! Second, we were able to feature an clever DIY bridal party gift. Here is a link to that issue jam packed with all things wedding.

On another note, how about a super easy DIY home decor project?

Its been 1 year since my husband and I moved into our home. There are so many design projects I'd love to tackle. I'm learning to take it one room at a time. I keep telling myself that with a little elbow grease and patience my house will one day feel like a home in the design and decor sense.

So here we go...dining room project #1! A little something I dreamt up after finding some old wood planks in our 1950s basement.

What you will need:
  • wood planks (approx 1" thick -- as you can see in the before and after below, our boards need some cleaning)
  • decorative moulding squares (super duper cheap @ Home Depot!)
  • drinking glasses (The style and amount is up to you! I chose glassware from Marshall's - $2.99 each...score! - in two different sizes)
  • pack of glass votives (easily found @ Michael's craft store!)


Step 1: 
Lay out your wood planks on the floor as they will appear once hung on your wall. Strategically lay out the moulding squares on the planks (with the rosette facing downward). Take into account the number of glasses you'll be using and their heights! 

Step 2: 
Place a piece of tape directly above each moulding square to serve as a place holder.   


Step 3: 
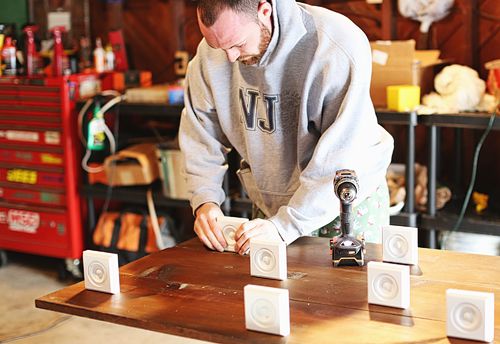
After taping, remove the moulding squares and move your planks to a work station where you can begin drilling. To prep the moulding squares, drill a shallow hole using a screw driver into the backside of each. Then drill a hole where your moulding squares were once placed on the planks (on the bottom of your tape marker, not the top!)


Step 4: 
Place all moulding squares back onto the planks making sure to line up the drill holes on the planks with the drill holes on the moulding squares. Grab your screw driver and begin securing each moulding square to the planks from the backside of each plank. Make sure each moulding square will be level so your glassware won't fall off!


Step 5: 
Drill each individual plank (with moulding squares already attached) directly onto your wall. You will want to have a level on hand to make sure everything lines up properly! Place a votive in each of your glasses. Place each glass onto a moulding square and lite 'em up!